|
 |
|
Focal Pointe Observatory
Astrophotography by Bob Franke |
|
Home
Recent Images
Galaxies
Nebulae
Natural Color
Narrow Band
H-Alpha
Clusters
Comets
Solar System
Observatory
Equipment
Tips & Tricks
Published Images
My Freeware
Local Weather
Terrestrial
Send Email
|
Correcting Galaxy Color

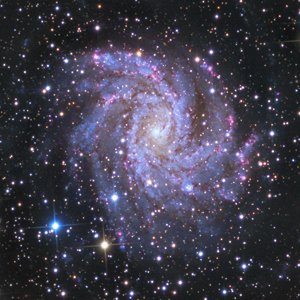
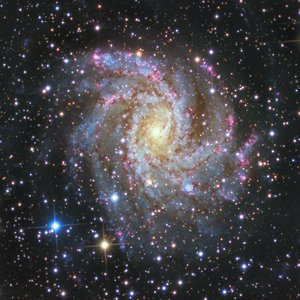
| The above image,
of NGC 6946, shows a typical color shift to red. Because NGC 6946 is at
low galactic latitude, we view it through a lot of dust and various
nebulae. This causes the light to become reddish, just as the Sun is red
at sunset. The effect is called Galactic Extinction.
Using G2V stars, or in this case
eXcalibrator,
the color was calibrated using the foreground stars. These nearby stars
are not affected by extinction. This results in an image with correct
star color and the galaxy shown in its apparent color.
There is nothing wrong with this image, as it
shows the galaxy approximately as viewed from Earth. However, we may prefer
to represent the galaxy with its intrinsic color. The following tutorial
shows two ways to correct the color. The first uses galactic extinction
data, from the NASA/IPAC Extragalactic Database (NED). The second method
corrects the color by balancing the histograms for the red, green and
blue channels. |
|
|
|
The NED Correction Method
|
The
below table shows the NED foreground extinction data for NGC 6946.
We can see that the blue is reduced by magnitude 0.342 and the red
increased by 0.219, relative to the green.
|
Bandpass
|
B |
V |
R |
|
Wavelength [um] |
0.440 |
0.540 |
0.650 |
|
A_lambda [mag] |
1.475 |
1.133 |
0.914 |
This makes it easy to calculate the red and
blue correction factors.
Red = 2.512(0.914 - 1.133)
= 0.817
Blue = 2.512(1.475
- 1.133) = 1.370 |
|
Correcting the color with PhotoShop
-
Copy the image to a new layer. All
modifications are made on this layer.
-
Use your favorite
tool to select the stars. I use Noel Carboni's PhotoShop actions
or Russ Croman's method.
-
Now cut out the
stars. This preserves the star colors in the base layer.
-
With the lasso
tool, set the feather to 50 or 75 and select just the galaxy.
-
Use the Channel
Mixer to set the red channel to 82% and the blue to 137%.
-
Finally deselect
all and flatten the image.
Here is the result.
In this case, the NED correction has produced
an image that is too blue. This may be for one or two reasons.
First, the NED data is not correct... sometimes it is not. Secondly,
the original image is incorrect. |
|
Correcting The Color With Balanced Histograms
This method works well with nearby spiral
galaxies. This type of galaxy generally contains a variety of
stellar types. Therefore, it is a reasonable assumption that
the sum of all the light will be white. This is the basis for
correcting the color by balancing the black and white points for the
three color channels. Here's how to it.
First, repeat the above steps one through
four. |
|
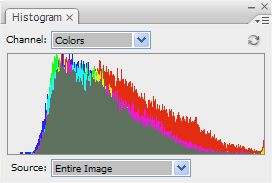
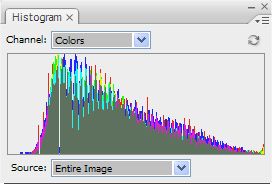
Here's how the
histograms look for the three color channels in the original image.
We can see that the blue and green already match each other quite
well. All we have to do is adjust the red. |
 |
|
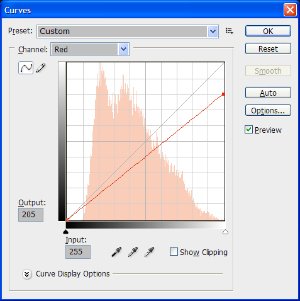
Applying a single point
curve, using an input of 255 and an output of 205, brings the
red histogram in line with the blue and green. |
 |
|
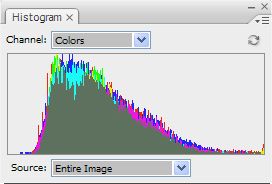
Here's the result of
the above curve.
Unfortunately,
severely reducing the white point of a channel will leave the image
darker and lifeless. |
 |
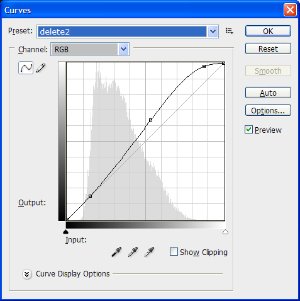
|
This curve was used to
stretch the three histograms into a profile similar to the original
image. This restores the image's brightness and contrast.
The same result may be possible by simply adjusting the brightness
and contrast. |
 |
|
Here is the profile of the final image.
With this image, only the application of a single curve aligned the
three histograms. Usually the process requires using both curves and
levels. With a little creative practice, it doesn't take long to
match up the three channels.
|
 |
|
Here is the final flattened image. |
 |
|
|
|
|